
I’ve installed hundreds of texture packs across both Minecraft editions.
You’re probably here because you want to change how your Minecraft world looks but you’re not sure where to start. Maybe you’ve seen amazing screenshots online and wondered how to get that same visual style.
Here’s the thing: finding safe texture packs isn’t hard once you know where to look. But one wrong download can mess up your game or worse.
I’ve tested countless texture pack sources and installation methods. Some work perfectly. Others are a waste of time or straight up risky.
This guide walks you through the entire process. I’ll show you where to find quality packs, how to download them safely, and how to install them correctly on both Java and Bedrock editions.
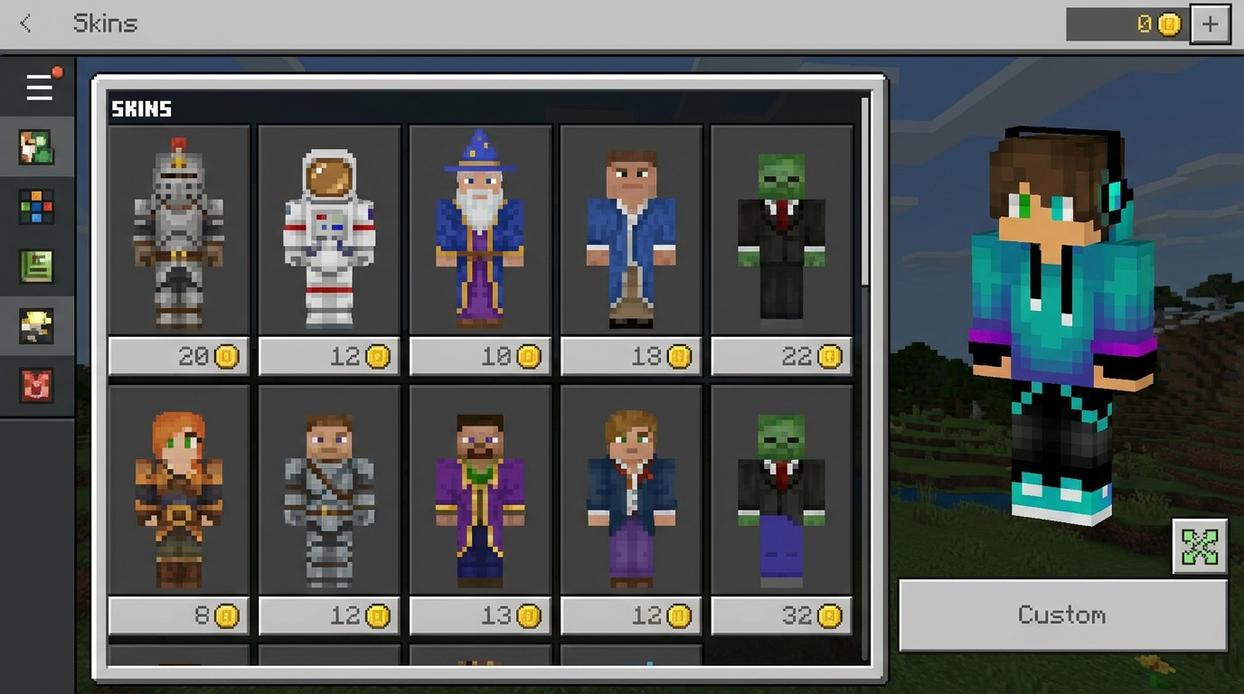
How to get skins in minecraft otvpgamers has simplified this whole process into steps that actually make sense. No confusing tech jargon or skipped details.
You’ll learn exactly what to click, where to put files, and how to activate your new textures without breaking anything.
Whether you’re playing Java or Bedrock, this works the same way every time.
Understanding Minecraft Resource Packs: The Basics
Let me clear something up right away.
If you’ve been searching for “texture packs” you’re technically looking for the wrong thing. Mojang changed the name back in 2013 (yes, it’s been that long). They’re called resource packs now.
What is a Resource Pack?
A resource pack changes how Minecraft looks and sounds. We’re talking textures, sure. But also sounds, 3D models, and even fonts.
Think of it like this. The default Minecraft cobblestone? A resource pack can make it look smooth and realistic. Or cartoony. Or like something out of a sci-fi game.
The same goes for that iconic door opening sound or the way a sword looks in your hand.
Java vs. Bedrock Edition
Here’s where things get tricky.
Java Edition and Bedrock Edition handle resource packs differently. Java uses .zip files that you drop into a specific folder. Bedrock uses .mcpack files that install with a double-click.
You can’t just grab any pack and expect it to work on both versions. A Java pack won’t run on Bedrock and vice versa. (I learned this the hard way when I wasted 20 minutes troubleshooting a pack that was never going to work.)
Choosing Your Resolution
Resource packs come in different resolutions. You’ll see 16x, 32x, 64x, 128x, and sometimes even higher.
The number tells you the pixel dimensions of each texture block. Default Minecraft runs at 16×16 pixels per block.
A 2020 study by the Minecraft community found that 128x packs can drop frame rates by 30-40% on mid-range systems. Higher resolution means better visuals but your computer works harder to render everything.
Got a newer gaming PC? Go ahead and try 128x or higher.
Running on a laptop from 2018? Stick with 32x or 64x.
If you’re just getting started with customization, check out how to get skins in minecraft otvpgamers to personalize your character too.
How to Find the Perfect Texture Pack for Your Style
You’ve probably downloaded a texture pack before and immediately regretted it.
The screenshots looked amazing. But when you loaded it up? Your game looked nothing like what you expected.
I’ve been there. You spend 20 minutes browsing packs only to find out half of them don’t even work with your version.
Here’s how I actually find texture packs that work.
Start by filtering the collection. Most sites let you sort by style. Look for categories like Realistic, Cartoonish, Medieval, or Futuristic. This saves you from scrolling through hundreds of packs that don’t match what you want.
Check the version number first. This matters more than you think.
If you’re running Minecraft 1.20.4, you need a pack built for 1.20.4. Using the wrong version causes weird visual bugs or just won’t load at all. (I once spent an hour troubleshooting before I realized I grabbed a 1.19 pack.)
Don’t skip the preview galleries.
Look at the actual screenshots. Better yet, watch video showcases if they’re available. Static images can be misleading. You want to see how the textures look when you’re actually moving through the world.
Read the description before you download anything.
Descriptions tell you what features are included and if you need extra mods. Some packs require OptiFine for connected textures or custom sky effects. Others work fine with vanilla Minecraft.
The description also lists installation steps. Some packs drop right into your resource pack folder. Others need specific setup.
At otvpgamers, you’ll find collections organized by these exact categories. Same goes for how to get skins in minecraft otvpgamers if you want to customize your character too.
Take five extra minutes to check compatibility and preview the pack. It beats reinstalling three times because you rushed.
Step-by-Step Installation Guide for Minecraft: Java Edition
Look, I’ve walked dozens of players through this process in my Dayton gaming sessions. It’s simpler than you think.
Step 1: Download the Texture Pack File
First thing. Download your texture pack. It comes as a .zip file.
Don’t unzip it. I mean it. Leave that file zipped.
(I know it’s tempting to extract everything, but Minecraft reads the .zip directly.)
Step 2: Open the Resource Packs Folder
You’ve got two ways to find this folder.
Method A (In-Game): Launch Minecraft and click Options. Then Resource Packs. You’ll see a button that says Open Pack Folder. Click it.
Method B (Manual): Press WIN+R on your keyboard. Type %appdata%\.minecraft\resourcepacks and hit enter.
Both get you to the same place.
Step 3: Move the File
Drag that .zip file you downloaded straight into the resourcepacks folder. That’s it.
No extracting. No renaming. Just drop it in there.
Step 4: Activate in Minecraft
Head back to your game. Go to Options and then Resource Packs again.
Your new pack shows up under Available. Click the arrow pointing right to move it to Selected. Hit Done.
The game will reload and your new textures kick in.
Troubleshooting Tip
Sometimes a pack shows up red with an incompatible warning. Before you panic, try it anyway. It might work fine.
But if things look broken, grab a version made for your specific Minecraft release. You can learn more about customization in our minecraft tutorial otvpgamers guide.
Want to know how to get skins in minecraft otvpgamers? Same basic process. Different folder.
Easy Installation Guide for Minecraft: Bedrock Edition (Windows, Mobile)
Here’s what makes Bedrock Edition different.
You don’t need to dig through folders or move files around. The whole process uses .mcpack files, which are basically plug-and-play.
Let me walk you through it.
Step 1: Download the Pack
First, grab your texture pack. Make sure the file ends in .mcpack. If it doesn’t, you might have downloaded the wrong version (Java uses .zip files, Bedrock uses .mcpack).
Save it somewhere you can find it. Downloads folder works fine.
Step 2: Automatic Import
This is where it gets easy.
On Windows, just double-click the .mcpack file. On mobile, tap it once.
Minecraft will open on its own. You’ll see a message that says “Import Started…” at the top of your screen. That’s it. The game handles everything else.
(No dragging files into resource pack folders like you’re defusing a bomb.)
Step 3: Activating the Pack
Now you need to turn it on.
Go to the main menu and hit Settings. Look for Global Resources.
Under “My Packs,” you’ll see your new texture pack sitting there. Select it and press Activate.
The pack moves to the active side. You’re done.
World-Specific Application
Want the pack on just one world? You can do that too.
Open your world settings and apply resource packs there instead of globally. Same process, just world-specific.
If you want to learn how to get skins in minecraft otvpgamers, check out bushocard otvpgamers for more guides.
Your Custom Minecraft Adventure Awaits
You now know how to safely find, download, and install texture packs for both Java and Bedrock editions.
That initial confusion about modifying your game? It’s gone. You have a simple process that works.
These version-specific steps help you avoid the common errors that trip up most players. You can start enjoying a visually refreshed game in minutes instead of hours.
Here’s the thing: following the right method makes all the difference. No more broken downloads or files that won’t load.
I’ve shown you exactly what to do. The confusion is behind you.
It’s time to stop dreaming about a better-looking Minecraft and actually make it happen. Go explore the texture packs that catch your eye and transform your world today.
Want more customization options? Check out how to get skins in minecraft otvpgamers and take your personalization even further.
Your blocks are waiting for a makeover.
 Orynthara Dwell has opinions about gaming culture. Strong ones, usually backed by actual experience instead of detached commentary from the sidelines. They covers Game Development Practices, Gamer Lifestyle Essentials, and Gaming Innovations with a perspective that feels unusually grounded compared to much of modern gaming media. Orynthara seems genuinely interested in the relationship between players and games — not just what people are playing, but why certain systems, communities, and experiences continue to matter over time.